
KJH
k3s Install 본문
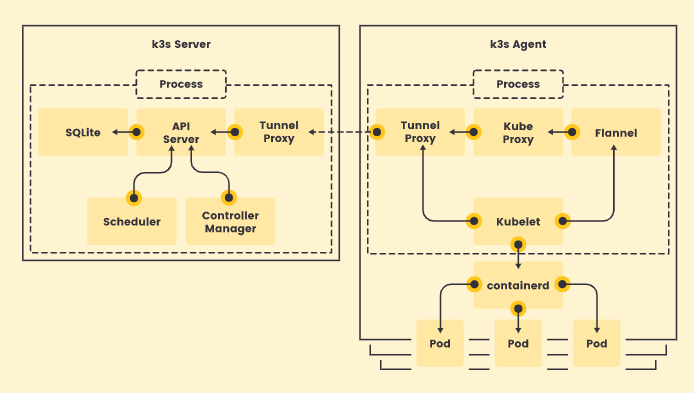
1. K3S란
- 경량화된 K8S입니다. K8S와 똑같이 사용하면 되지만, controller, api-server, proxy와 같은 kube-system 배포 방식에 차이가 있습니다.
- K8S는 클러스터 설치 방법에 따라 kube-system이 docker나 pod로 배포가 되지만, K3S는 K3S 바이너리가 서버에 설치가 되고, 해당 바이너리와 함께 프로세스 단에서 kube-system들이 동작합니다.
- K3S는 default Ingress-controller가 nginx가 아닌 traefik를 사용하고, default key 저장소는 etcd가 아닌 SQLite를 사용합니다.
2. Cli 설정
- k3s 설치 이후 진행하면 됩니다.
2.1 Kubectl 설정
$ mkdir ~/.kube
$ sudo cp /etc/rancher/k3s/k3s.yaml ~/.kube/config
$ sudo chown ${USER}. /etc/rancher/k3s/k3s.yaml ~/.kube/config
$ chmod 600 ~/.kube/config
2.2 Containerd Cli 설정(필수 X)
$ sudo chown ${USER}. /var/lib/rancher/k3s/agent/etc/crictl.yaml
$ sudo chown ${USER}. /run/k3s/containerd/containerd.sock
$ crictl --config /var/lib/rancher/k3s/agent/etc/crictl.yaml ps
$ crictl --config /var/lib/rancher/k3s/agent/etc/crictl.yaml pods
3. Cluster 구성
3.1 ALL in One Cluster
$ curl -sfL https://get.k3s.io | INSTALL_K3S_VERSION=v1.19.3+k3s3 sh -s - --write-kubeconfig-mode 600
3.2 Single(master, worker) Cluster
# master node k3s 설치
$ curl -sfL https://get.k3s.io | INSTALL_K3S_VERSION=v1.19.3+k3s3 \
    sh -s - --write-kubeconfig-mode 600

# master node token 출력
$ sudo cat /var/lib/rancher/k3s/server/node-token

---------------------------

# worker node k3s 설치
$ curl -sfL https://get.k3s.io | INSTALL_K3S_VERSION=v1.19.3+k3s3 \
    K3S_URL=https://{master노드 ip}:6443 K3S_TOKEN={토큰 입력} sh -
3.3 Multi(master, worker) Cluster
- master 3대부터 HA 구성이 가능합니다.
# master1 node k3s 설치 (master1번과 2, 3번 설치 명령어가 다릅니다.)
$ curl -sfL https://get.k3s.io | INSTALL_K3S_VERSION=v1.19.3+k3s3 \
    sh -s - --write-kubeconfig-mode 600 --cluster-init

# master node token 출력
$ sudo cat /var/lib/rancher/k3s/server/node-token

---------------------------

# master2 node k3s 설치
$ curl -sfL https://get.k3s.io | INSTALL_K3S_VERSION=v1.19.3+k3s3 \
    sh -s - --write-kubeconfig-mode 600 --server https://{master노드 ip}:6443 --token {토큰 입력}

---------------------------

# worker node k3s 설치
$ curl -sfL https://get.k3s.io | INSTALL_K3S_VERSION=v1.19.3+k3s3 \
    K3S_URL=https://{master노드 ip}:6443 K3S_TOKEN={토큰 입력} sh -
4. traefik controller dashboard 활성화
$ cp /var/lib/rancher/k3s/server/manifests/traefik.yaml ~/
$ chown ${USER}. ~/traefik.yaml

## 10,11,12번 줄만 추가하면 됩니다.
$ vi traefik.yaml
----------------------------
spec:
  chart: https://%{KUBERNETES_API}%/static/charts/traefik-1.81.0.tgz
  valuesContent: |-
    dashboard:
      enabled: true
      domain: traefik.{DOMAIN}.com
----------------------------

$ kubectl apply -f ~/traefik.yaml
5. 삭제
# master
$ /usr/local/bin/k3s-uninstall.sh
# worker
$ /usr/local/bin/k3s-agent-uninstall.sh
6. etcd cli 설치 및 사용법
6.1 etcd cli 설치
- etcd가 container 형태로 떠있는게 아니라서 cli를 설치해야 접근할 수 있습니다.
$ ETCD_VER=v3.4.13

$ GOOGLE_URL=https://storage.googleapis.com/etcd
$ DOWNLOAD_URL=${GOOGLE_URL}

$ rm -f /tmp/etcd-${ETCD_VER}-linux-amd64.tar.gz
$ rm -rf /tmp/etcd-download-test && mkdir -p /tmp/etcd-download-test

$ curl -L ${DOWNLOAD_URL}/${ETCD_VER}/etcd-${ETCD_VER}-linux-amd64.tar.gz -o /tmp/etcd-${ETCD_VER}-linux-amd64.tar.gz
$ tar xzvf /tmp/etcd-${ETCD_VER}-linux-amd64.tar.gz -C /tmp/etcd-download-test --strip-components=1
$ rm -f /tmp/etcd-${ETCD_VER}-linux-amd64.tar.gz

$ /tmp/etcd-download-test/etcd --version
$ /tmp/etcd-download-test/etcdctl version

$ cp /tmp/etcd-download-test/etcdctl /usr/local/bin/
$ ln -s /usr/local/bin/etcdctl /usr/bin/etcdctl

$ cp /var/lib/rancher/k3s/server/tls/etcd/server-client.crt  ~/
$ cp /var/lib/rancher/k3s/server/tls/etcd/server-ca.crt   ~/
$ cp /var/lib/rancher/k3s/server/tls/etcd/server-client.key ~/

$ chown ${USER}. ~/server-client.crt
$ chown ${USER}. ~/server-ca.crt
$ chown ${USER}. ~/server-client.key
6.2 etcd 예제
etcdctl --endpoints https://127.0.0.1:2379 --cert ~/server-client.crt --cacert ~/server-ca.crt \
        --key ~/server-client.key endpoint status --cluster --write-out=table
※ Traefik2 설치
- default가 traefik1 이기 때문에 k3s 설치시 옵션으로 disable 이후 따로 설치 합니다.
$ curl -sfL https://get.k3s.io | INSTALL_K3S_VERSION=v1.19.3+k3s3  \
    sh -s - --write-kubeconfig-mode 600 --disable traefik --cluster-init

$ helm repo add traefik https://containous.github.io/traefik-helm-chart
$ helm repo update

$ helm install traefik \
    --namespace kube-system \
    --set dashboard.enabled=true \
    --set rbac.enabled=true \
    --set="additionalArguments={--api.dashboard=true,--log.level=INFO,--providers.kubernetesingress.ingressclass=traefik-internal,--serversTransport.insecureSkipVerify=true}" \
    traefik/traefik \
    --version 9.1.1
'DevOps' 카테고리의 다른 글
| Terraform Variable (0) | 2021.11.03 |
|---|---|
| Terraform 시작하기 (GCP) (0) | 2021.10.31 |
| LVM 구성 (0) | 2021.07.08 |
| CentOS AirGap Repository 구성 (0) | 2021.07.08 |
| Elastic Search 데이터 삭제 정책 등록(ILM) (0) | 2021.07.08 |
'DevOps' Related Articles
more


